Know the extent of the problem before you start:
Begin by gently and carefully brushing the leather item (a large, fairly soft artist’s paintbrush is ideal) to remove any loose surface material. Starting with a small inconspicuous area, try dipping the brush in methylated spirit to help you to remove dust and dirty marks.
Deal with a small area at a time and be careful not to soak the leather. Always use meths sparingly and beware of naked flames. Allow the leather to dry thoroughly after cleaning.
If the leather is very grubby you may need to use luke-warm water, a good quality saddle soap (we like Fiebings) and a soft 1" paint brush brush to shift the dirt. Take the tin of saddle soap and using the brush and water to create a lather (think shaving brush!) work the foam into the surface of the leather and use it to loosen as much dirt as possible. Always wipe or rinse off the lather properly after cleaning.
When the leather is clean, look for loose or damaged stitching and make a note of what needs to be repaired. Check any buckles, rivets and hardware and make a note of exactly what needs to be done with them. Always take photographs if you want to replace broken fittings. It is much easier to send a good digital image by email than explain what a buckle looks like over the phone.
The object of this exercise is to understand the extent of the task before you start work. That way, you won’t take on more than you feel confident to handle.
Leather cases
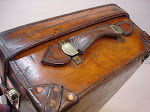
Look out for damage to handles and corners. Many 1930s and 1940s casemakers used copper or solid brass rivets which are very hard to find today.
Leather belts

Feed leather belts with a rich, beeswax based conditioner like Skidmore's to bring out faded colours
Why use Skidmore's?

Easy - we tried everything else and nothing works as well as this stuff. It isn't expensive and does exactly what it says on the tub. It really is infinitely useful!
Case corners
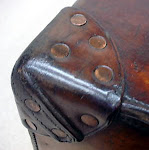
Corners may be stitched or riveted. Check you can get a replacement fastening before starting the repair. Nothing looks worse than a mismatch. Finish off with Skidmore's and a soft cloth.
Gloves and motorcycle or driving gauntlets

Use a good quality leather conditioner like Skidmore's Restoration Cream to keep gloves and soft leather supple
Skidmores Restoration Cream

Skidmores is great on leather but it works just as well with wood. Because it is made from beeswax and other good and natural things you can use it just about anywhere.
No comments:
Post a Comment